

Expanding or collapsing an image on one side
28 posts
• Page 1 of 2 • 1, 2

Expanding or collapsing an image on one side
![]() by dmm132 » Wed Jul 06, 2011 10:52 pm
by dmm132 » Wed Jul 06, 2011 10:52 pm
Does anyone know an easy way to collapse or expand an image when zoom x and y are unlocked and you want to move one side of the image and keep the other side of the image in the same spot. For instance, when I move the Zoom x up or down, the image collapses or expands from the middle. I would like to move one side of the image, say the right side, using the handle on the bounding box and keep the left side of the image in the exact same place. Similarly, when moving the Zoom y values.
dmm132
dmm132


Re: Expanding or collapsing an image on one side
![]() by BarbaraC » Thu Jul 07, 2011 4:54 am
by BarbaraC » Thu Jul 07, 2011 4:54 am
Image editors can do this with ease, but I think you'll have to do it in Producer visually and manually, shifting the horizontal pan.
I'm still waiting for the ability to adjust zoom separately for all four sides.
Barbara
I'm still waiting for the ability to adjust zoom separately for all four sides.
Barbara
The Frame Locker - styles, transitions, frames, backgrounds, & more.
Subscribe to Frame Locker News for alerts to new products.
How-to's: ProShowThink
Subscribe to Frame Locker News for alerts to new products.
How-to's: ProShowThink
Re: Expanding or collapsing an image on one side
![]() by heckydog » Thu Jul 07, 2011 6:06 am
by heckydog » Thu Jul 07, 2011 6:06 am
My preferred method, and it's not the only way to do it, is to expand the canvas size in a photo editor and then output as a png file. Below is an example.
The original photo is on the right. By doubling the canvas size on the left side it moves the anchor point to the left edge of the photo, which won't be seen in a png file. The "X" indicates the new anchor point. By manipulating the canvas size you can make the photo swivel off of any edge.
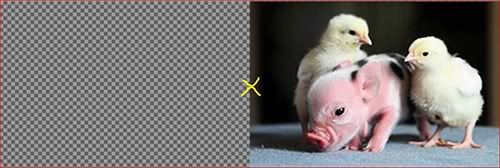
Joe
added: looks like part of the picture got cut off but you get the idea.
The original photo is on the right. By doubling the canvas size on the left side it moves the anchor point to the left edge of the photo, which won't be seen in a png file. The "X" indicates the new anchor point. By manipulating the canvas size you can make the photo swivel off of any edge.
Joe
added: looks like part of the picture got cut off but you get the idea.
Re: Expanding or collapsing an image on one side
![]() by BarbaraC » Thu Jul 07, 2011 6:34 am
by BarbaraC » Thu Jul 07, 2011 6:34 am
I'll bet anything there's a formula using a ratio. As x increases/decreases, center point decreases/increases. Just wait. Dale will spot this thread and consider it a challenge. 
Barbara
Barbara
The Frame Locker - styles, transitions, frames, backgrounds, & more.
Subscribe to Frame Locker News for alerts to new products.
How-to's: ProShowThink
Subscribe to Frame Locker News for alerts to new products.
How-to's: ProShowThink


Re: Expanding or collapsing an image on one side
![]() by im42n8 » Thu Jul 07, 2011 7:07 am
by im42n8 » Thu Jul 07, 2011 7:07 am
To zoom an image from 0% zoom to some value of zoom (or vice-versa) while holding one axis in place you can do it empirically (guess a location and test, repeat until the edge doesn't move) or exactly.
For exact numbers you need to use a bit of geometry. For this example, I'm going to use a 3:2 image in a 16:9 frame. Let Xi be the distance from the image's center to its edge. Let X be the distance from the screen center to the frame edge. Xi is proportional to X by the amount of image zoom.
Assuming the image is located at 0,0, and the image is scaled to "fill frame," it will stop zooming (re-sizing) as soon as the image edges have reached the screen edges. So, that means that Xi = X times the image zoom. If the image is zoomed to 65%, then the image edge is located at 32.5 (that is, X times Z, or 50•0.65). That is the value you will use for the pan-x keyframe that has its zoom-x go to 0 (plus value for the right, minus value for holding at the left). The image's edge will hold steady at that horizontal location as the zoom changes.
It's a bit different for the vertical (we need to consider the impact of image aspect). In this case, the image extends beyond the frame by a certain percentage, above and below. Since we're looking for the "Y" value, our ratio is setup to look for the amount that is visible in the screen. So, 3/Y=16/9 and Y=3(9/16)=1.6875. Since we have a side of the image that's 2 units (the other being 3 units), then 2 - 1.6875=0.3125 (the number of units that are "off-screen"). Divide this in half (to get the amount above or below the frame) and we get 0.1563. Divide this by 1.6875 (the 100% that makes up the image in the frame) and we get 0.0926. So, 9.26% is above and 9.26% below the edges of the screen.
I'm still using an image that has been zoomed down to 65%. Now, we have the information we need to find the top edge of the image (which is where we want to hold the zoom increase/decrease to). We have the part that would appear in the frame plus the part that would appear above (or below) the frame: 0.65(50) + 0.65(9.26) = 38.52.
That's the layer's zoom-y % (the zoom value divided by 100) times the pan-y (the value in the pan-y box) from screen center to top/bottom plus the layer's zoom-y times the "off-screen" amount.
This is the pan-y value you will use to hold the edge steady at that vertical location while zooming the y-axis up to 65 from 0 or down to 0 from 65. Again, the pan-y value you will use is a positive value to expand to the bottom or a minus number to expand to the top.
• The Pan-X keyframe value where Zoom goes to 0 is the Zoom-X % times the Frame Width (or 50%).
• The Pan-Y keyframe value where zoom goes to 0 is the Zoom-Y % times the Frame Width plus the Layer's Zoom-Y % times the "above/below" amount.
Use this same logic for other scales (that is, Fit to Frame). It takes some time to figure out exact numbers for the different scales. That's primarily because you're not (at least I'm not) used to thinking in these terms. It's a bunch of ratios that you're looking for! I did have the option for Fit to Safe Zone ... but figuring this out using geometry is a bit more challenging. It's best to use the empirical method: select a spot, test. If the edge moves, try another location and try again. Also, it's fast. Note this also assumes that no rotation is being used (rotation = 0).
Until Photodex implements a way to specify a zoom center change, this is how you do it. I have been delving into a geometrical approach to solving some image rotation situations. This is one of the fall-outs from that approach (finding the exact edge of a layer relative to the screen).
Well, hope this helps. If nothing else it points you in the right direction!
Dale
PS It looks worse than it really is. Take the instructions above a step at a time and you'll find it's not all that bad. It'll give you an understanding of why the numbers are what they are. Also, note that empirical testing for the right number is hard to beat unless you've got this stuff tucked away in a spreadsheet to do all the work for you!
Last edited by im42n8 on Sun Jul 10, 2011 1:11 pm, edited 3 times in total.
Re: Expanding or collapsing an image on one side
![]() by BarbaraC » Thu Jul 07, 2011 7:58 am
by BarbaraC » Thu Jul 07, 2011 7:58 am
OMG, Dale! All my brain cells are now so tangled up that I have to go sit on the back steps and stare vacantly at the yard.
Barbara
Barbara
The Frame Locker - styles, transitions, frames, backgrounds, & more.
Subscribe to Frame Locker News for alerts to new products.
How-to's: ProShowThink
Subscribe to Frame Locker News for alerts to new products.
How-to's: ProShowThink
Re: Expanding or collapsing an image on one side
![]() by im42n8 » Thu Jul 07, 2011 9:47 am
by im42n8 » Thu Jul 07, 2011 9:47 am
Yeah, I spent a bunch of time working out the details for another problem. This stuff kinda popped out as a consequence. It wasn't something I was looking for. However, it explained the numbers I was coming up with during the empirical selection process. Once you have an understanding of what's going on the rest comes together somewhat easier (if you're not used to it tho, it can be a bit confusing to define the problem and its parts).
Figuring out the relationships that formed the basis for those numbers was a buggeroo. Putting it all into a spreadsheet helps figure it all out quickly tho (it's a pain doing it all by hand!). The spreadsheet route also helps to determine relationships between 2 disparate sized layers that must rotate together seamlessly.
The information is there. Figuring out how to use it effectively can be a challenge though under certain circumstances. Hopefully Photodex will simplify the process for us sometime in the not too too distant future.
Dale
Re: Expanding or collapsing an image on one side
![]() by heckydog » Thu Jul 07, 2011 10:13 am
by heckydog » Thu Jul 07, 2011 10:13 am
im42n8 wrote:
The information is there. Figuring out how to use it effectively can be a challenge though under certain circumstances. Hopefully Photodex will simplify the process for us sometime in the not too too distant future.
Dale
They gave us the ability to change the rotation center, it shouldn't be much of a leap to be able to change the zoom center as well. imho, they should have worked off the same anchor point right from the start.
Joe
Re: Expanding or collapsing an image on one side
![]() by im42n8 » Thu Jul 07, 2011 10:51 am
by im42n8 » Thu Jul 07, 2011 10:51 am
I wonder if Photodex just didn't think about it or didn't think that it was something people would use. Or maybe it was the UI changes that might be required. They have the information needed: zoom value, pan location, and layer aspect. With it they can relatively easily figure out the relations (at least for a given layer ... not in relation to another -- that can get complicated).
You might not realize it but when Photodex gave us the ability to change rotation center it was an incomplete feature. While you could identify what corner or side (or portion within the area of the image) to rotate the image at, if you wanted to rotate the image relative to the frame or another layer (values outside the confines of the layer boundaries), you had to work out the correct relations and then calculate the values. Empirical choices are harder to work out correctly than figuring out where an image edge might be.
Once the image's zoom is changed, the rotation center numbers relative to the screen change proportionately as well. Figuring out what those numbers are relative to the image can be challenging (screen-relative pan values won't work). It would be nice if they could give us an improved selection of a rotation center which extends beyond a layer's edges.
Dale
Re: Expanding or collapsing an image on one side
![]() by BarbaraC » Thu Jul 07, 2011 11:07 am
by BarbaraC » Thu Jul 07, 2011 11:07 am
Heck, I'd be a waggly-tailed puppy if they just gave us the ability to grab the rotation center with the hand cursor and move it.
Barbara
Barbara
The Frame Locker - styles, transitions, frames, backgrounds, & more.
Subscribe to Frame Locker News for alerts to new products.
How-to's: ProShowThink
Subscribe to Frame Locker News for alerts to new products.
How-to's: ProShowThink
Re: Expanding or collapsing an image on one side
![]() by dmm132 » Sun Jul 10, 2011 11:07 am
by dmm132 » Sun Jul 10, 2011 11:07 am
Thanks everyone for your insight and help. A special thanks to you, Dale, I am still trying to wrap my head around your solution. I would think that Photodex should certainly be able to figure this out and put it in an update, at some point. It sure would be great. I'm sure everyone would be appreciative.
Joe, I have seen that method used and it works great. Because you have to double the image with a transparent equal in a photo editor, it makes it difficult to create a layer style with it. But, thanks, that is a relatively easy way to do it.
I was just hoping that there would be some easy way as in Photoshop, where when using the Free Transform tool, you just have to hold down the Ctrl, Option or Shift keys and drag on a bounding box handle and it would behave the way you'd want. That would also be ideal when wanting to change prospective.
Dina
Re: Expanding or collapsing an image on one side
![]() by dmm132 » Tue Jul 12, 2011 3:25 pm
by dmm132 » Tue Jul 12, 2011 3:25 pm
I found a wonderful website that has some nice layer style packs for purchase at a very reasonable cost (cost is shown in British pounds but it’s still reasonable) and dozens of free stuff including styles, templates, masks and graphic. He may even be a member here but I know him as Pete at Pete's Slide Styles, http://www.palwebs.co.uk/pstemplates/index.html . It’s worth checking out. Check out all the free stuff.
Anyway, sometimes, it is worth looking at a layer style that’s been created by someone else to see how they make something work and figure out how to do something. But while I was just watching some of his Grid style samples, I came up with an idea for solving my problem.
You will need a photo editor to create .png files. Here it is:
Create two 9x16 transparent files. In one, draw a 5 pixel vertical line in the center of the file. In the other, draw a 5 pixel horizontal line in the center of the file. I made the vertical white and the horizontal yellow. Save them both as a .png file.
In Proshow Producer, add one of the files to your slide. Let's say you want to expand an image keeping the left side of the image stationary. In this case, add the vertical line file. In your preview window, right click and make sure your display option is either set to Darken Interactive Layers or Show Interactive Layers.
Position your image where you want it in the Starting KF. Change your zoom to whatever you want. In the Effects tab, Motion Effects, set Copy Start to End. Now, move the white vertical line to align with the left size of your image. Next, unlock the zoom of your image at the Starting and Ending KF. To grow your image, set the Zoom x to 0 in the Starting KF. Select the Vertical line image, copy the Pan x value, the copy it into the Pan x of your image. Hide the Vertical Image line and it’s done.
To contract your image, set the Zoom x to 0 in the Ending KF and copy the Pan x value of the vertical line into the Pan x of the Ending KF.
The idea is similar for vertical expansion/contraction except in this case you would open the horizontal line and you use the Pan Y value of that aligned line.
I did both of these technique simultaneously and the image grew from the corner. Pretty neat.
Dina
Re: Expanding or collapsing an image on one side
![]() by im42n8 » Tue Jul 12, 2011 8:52 pm
by im42n8 » Tue Jul 12, 2011 8:52 pm
If you want an all Producer version of the above technique that's quick and easy, one way to do it is to add temporary 16:9 solid or gradient layer (fill frame or fit to frame scaling). Make it a color that will stand out (I usually use a brilliant green...).
For a vertical line set the zoom-X to 1 and leave the zoom-y at 100. (I add a negative 0.5 constant modifier to make the line even narrower, but that's just a personal choice). For a horizontal line set the zoom-Y to 1 and leave the zoom-X at 100.
Next, align the line to the image's edge by varying the pan-x (for the vertical line) or pan-y (for the horizontal line). When it's right against the image edge, note the pan value. This is what you'll use as the pan value for the keyframe where the image's zoom value goes to zero (and where the image's edge will remain stationary).
Quick and easy and all done within Producer.
Dale
PS this is one of the techniques I used before I learned how to calculate the exact value of the image's edge location. I still use it for quick answers when I don't have the spreadsheet loaded.


Re: Expanding or collapsing an image on one side
![]() by gpsmikey » Tue Jul 12, 2011 9:20 pm
by gpsmikey » Tue Jul 12, 2011 9:20 pm
then there is the way I do that sort of thing. Start with the full size image. Stick a post-it note to the screen at where you want the edge to stay then adjust the image to stay lined up with the post-it note. Keep laughing - it works !! 
mikey
mikey
You can't have too many gadgets or too much disk space !!
mikey (PSP6, Photoshop CS6, Vegas Pro 14, Acid 7, BluffTitler, Nikon D300s, D810)
Lots of PIC and Arduino microprocessor stuff too !!
mikey (PSP6, Photoshop CS6, Vegas Pro 14, Acid 7, BluffTitler, Nikon D300s, D810)
Lots of PIC and Arduino microprocessor stuff too !!
Re: Expanding or collapsing an image on one side
![]() by im42n8 » Tue Jul 12, 2011 9:25 pm
by im42n8 » Tue Jul 12, 2011 9:25 pm
I've used that method as well. I have also used my finger !
Dale
Dale
28 posts
• Page 1 of 2 • 1, 2
Who is online
Users browsing this forum: No registered users and 9 guests