Frame Sizing/Position Options
Sat Jan 01, 2011 9:54 am
I'm not sure the best way to describe this, but I'll give it a try.
I would like to be able to define the size/position of the 'Frame' surrounding each picture WITHOUT having to use masking. For example, I would like to add a slide with 1 (or more) picture(s) in it. Layer 1's pic I would like to be only 75% of the screen but I want my picture to fill it 100%. If I pan/zoom my picture it would not show outside the 75% frame as it will all happen inside the frame. I would also like to pan/zoom this frame at the same time as pan/zoomming the pic inside the frame (effectively making 2 movements at once).
I see this helpful when I have more than one picture on the screen at once with layers. I can currently pan/zoom each picture but it changes the size of the frame of the picture on the screen at the same time unless you use masking. Thus our layered pics are quite static as you can only move them without changing the sizes. That is pretty limiting.
It seems that this would be quite simple if you were able to define a "frame" around each picture instead of a mask. Then we would be able to pan/zoom our pics within the smaller 'frames' without changing the relative size of the pic on the screen. This could be VERY powerful and add a lot of liberty to picture movement.
Does anyone have a better way to describe what I'm trying to say?
FH3
Re: Frame Sizing/Position Options
Sat Jan 01, 2011 10:19 am
I think you need a better understanding of masking, cause it seems like you think you can only mask one of two images in one slide? Is that what you are referring to as being a problem?
Also, if you don't want to use a mask, but would like to use a frame that does not move while zooming your image , you can make a layer with a transparent center in an outside editor, behind which you zoom your image . Or you can add a layer ( solid or gradient), unlock x and y, make it long, but narrow, place it at the bottom, duplicate, but place it at the top, duplicate, place it at the side ( either turned or x and y values changed so it becomes a strip) and duplicate this once more and place across so these four make a frame, Underneath it you can zoom an image layer, etc.
Behind a mask you can put more than one layer. You can attach a transition to the last kf from the top image behind it somewhere in the slide duration, so the layer underneath will come to show, or attach a transition to the first kf of the top image which starts somewhere during the duration of the slide
Re: Frame Sizing/Position Options
Sat Jan 01, 2011 10:49 am
Thanks for the reply and the good "Work-Arounds". Don't get me wrong, I understand that there are some time/outside-software intensive work-around solutions.
I'm suggesting an all-in-ProShow solution that would be very powerful and simplified. I'm basically suggesting a way to turn our 'work-arounds' into a Feature.
FH3
I'm suggesting an all-in-ProShow solution that would be very powerful and simplified. I'm basically suggesting a way to turn our 'work-arounds' into a Feature.
FH3
Re: Frame Sizing/Position Options
Sat Jan 01, 2011 11:14 am
This program is not Adobe Photoshop, where you can create images on a transparent background.
Am I right to think you would want a frame with surroundings from which behind you can show a picture?
If there was a possibility to create a frame in producer frame with a transparent inside with just one click, this would not improve a thing.This would limit you to use only one frame with surroundings in one slide, cause adding one on top would cover the one underneath. Not so with masking
. Masking is what is the most easiest solution to do what you want to accomplish.
Put some effort in learning how masking works and you will come to understand that the feature you are requesting is one that will come with more restriction than masking your images. ( which you can layer endlessly )
Re: Frame Sizing/Position Options
Sat Jan 01, 2011 12:30 pm
I'm doing a poor job describing what I'm thinking.
I'm trying to present a solution to control the size and position of pictures entirely within PSP for those who do not have other software or know-how to create masks. I understand that a mask can solve some of this solution but it requires some time and other software and this may not be necessary.
I'm suggesting that we have new settings for each picture on each layer. The settings would determine the 'Content Frame' position/size (pan/zoom). Within that frame, the normal picture motion (pan/zoom) would take effect. This would do away with the need for masking for this type of movement.
I've attached a link to a quick sketch of what I'm thinking. Warning!: My drawing abilities are as bad as my explanations!
http://www.hodsonhome.com/cmmc/frame.jpg
FH3
Re: Frame Sizing/Position Options
Sat Jan 01, 2011 1:15 pm
Are you familiar with the process of creating a solid color layer (or gradient layer) and then using it as a mask ?
You can resize this layer in any dimension that you wish by unlocking the x and y coordinates, and you can position it anywhere on the screen.
The picture being masked can display only the parts that you wish, zoom in (or not) as you wish, rotate, expand, etc.
I think that it's pretty much what you are looking for, and does not require any other program. Just Producer.
If this is what you are looking for, I can give you a more detailed description.
Re: Frame Sizing/Position Options
Sat Jan 01, 2011 2:17 pm
I would be interested in how you use this that mask. I'm curious how that will work with mulitple pictures/masks/layers. Thanks.
FH3
FH3
Re: Frame Sizing/Position Options
Sat Jan 01, 2011 5:05 pm
FH3
I don't know if Mona has contacted you,and provided you with detailed instructions. If you still need to figure out how to work with a mask that covers multiple layers, revealing one at the time, while changing position , and changing zooms of layers underneath the mask, I've some screen shots that might explain this better than just words will do.
You can email me so I can forward you those screen shots, as I don't have them on the website yet, so I am unable to embed them in this thread.
Re: Frame Sizing/Position Options
Sat Jan 01, 2011 7:52 pm
Sorry for getting back to this thread a little late. My hours are a bit different 
Here is a more detailed explanation on how to create solid color layers that can be used as masks.
I am giving you a very simple example first:
In Motion Effects:
Place your picture in the slide.
Press the + (plus) sign and choose "Add Solid Color". (the color is not important, it can be white as the default or any other color that you like).
This will add a colored layer as the top layer of your slide.
Unlock the x and y coordinates of this layer, and drag the corners to the size and form that you want. This is the layer through which your picture will be seen.
Right click on this layer and choose: Use as masking layer
This is how your screen should look like:
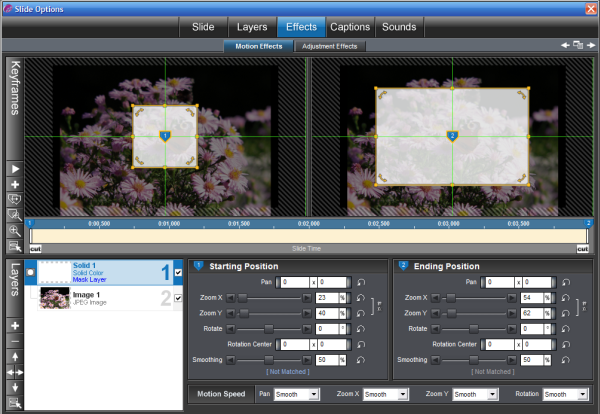
Go to Layers > Layers Setting > Masking Layer > Choose the type as Alpha Transparency
If you position now your mouse on the layer with your picture, this is what you will see:

This is the actual preview of your slide when you play it:
You will see first a small square of your picture, which will expand to a larger preview.
Remember: Everything under the mask is revealed. All else is covered (unseen).
Because of this, you can now zoom into your picture as you wish, (either at the beginning of the slide or at it's end), and only the parts that are covered by the mask will be visible.
May I suggest that you practice with this technique with one picture per slide first.
If you wish to use this technique for multiple layers, you will need to place more pictures under the mask, each picture entering the slide at different times (keyframes).
If you wish to move the mask from layer to layer, you will also have to use keyframes for both the mask and the pictures.
Please let me know if this solves your problem.
Here is a more detailed explanation on how to create solid color layers that can be used as masks.
I am giving you a very simple example first:
In Motion Effects:
Place your picture in the slide.
Press the + (plus) sign and choose "Add Solid Color". (the color is not important, it can be white as the default or any other color that you like).
This will add a colored layer as the top layer of your slide.
Unlock the x and y coordinates of this layer, and drag the corners to the size and form that you want. This is the layer through which your picture will be seen.
Right click on this layer and choose: Use as masking layer
This is how your screen should look like:
Go to Layers > Layers Setting > Masking Layer > Choose the type as Alpha Transparency
If you position now your mouse on the layer with your picture, this is what you will see:
This is the actual preview of your slide when you play it:
You will see first a small square of your picture, which will expand to a larger preview.
Remember: Everything under the mask is revealed. All else is covered (unseen).
Because of this, you can now zoom into your picture as you wish, (either at the beginning of the slide or at it's end), and only the parts that are covered by the mask will be visible.
May I suggest that you practice with this technique with one picture per slide first.
If you wish to use this technique for multiple layers, you will need to place more pictures under the mask, each picture entering the slide at different times (keyframes).
If you wish to move the mask from layer to layer, you will also have to use keyframes for both the mask and the pictures.
Please let me know if this solves your problem.
Last edited by cherub on Thu Feb 24, 2011 9:37 pm, edited 1 time in total.
Re: Frame Sizing/Position Options
Sat Jan 01, 2011 9:58 pm
FH3,
Hope this helps .
Thanks Mona ,for saving the day. !
If there are still questions , let us know.
Anita
Hope this helps .
Thanks Mona ,for saving the day. !
If there are still questions , let us know.
Anita
Re: Frame Sizing/Position Options
Tue Jan 04, 2011 11:53 am
Go to my website, http://www.fenimorephotovideos.com/PSP/ ... /freebies/ and download my freebie Basic Producer Styles. Study them. They give multiple ways of accomplishing what you're trying to do.
These are all PSP solutions and the method used therein are applicable to multiple images. Plus, the solutions you see are fairly quick to accomplish. I think you will be surprised.
What you're describing requires masking. The masks required can all be done within PSP using a solid or gradient layer or using a copy of the image itself. Further adding a "frame" (a colored area surrounding the image edges) is also a slide or gradient layer or a copy of the image itself. Each has its advantages and disadvantages.
Multiple pictures can be within the frame . . . it depends on how you want to display them. Or you can move the masked images together and put the frame layer beneath them and sized to appear like a frame around all images. (The viewer will never know how its constructed).
Good luck!
Dale